Pages

Thursday, November 14, 2013

Send Email to Multiple Person or Group in SPD Workflow

SharePoint 2013 is forging ahead with great force and especially office 365 and SharePoint online is quickly becoming a new mantra for SharePoint implementation. SharePoint workflow is improved significantly in 2013 and there are so many activities that are deprecated especially the activities that we got used to in 2010 for Document Sets and impersonation etc.

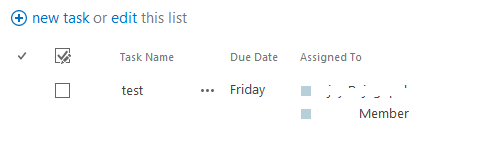
Recently I had to create a SharePoint designer workflow in SharePoint online. The workflow is to send notification to users on their tasks. The objective looks simple correct? Yes, the workflow is also simple and it is one step workflow, but the devil is in the detail. The workflow needs to send email based on Assigned To Field in the tasks lists. As all of us know AssignedTo field take both Groups and users. So in a sense the workflow needs to email a group of people or send email individually to all users specified in the Assigned To field.

So far so good but here is where i stumbled upon. I used the send email activity and I chose the return type as "Email; Semi colon Delimited" as shown below.


Then I specified 2 users in the assigned to field and ran the workflow.


I had a Log to History activity in the workflow and what I found email delimited with semi colon in the History but Workflow failed to send email. Below is the error message I got.


After breaking my head as I cannot use Correlation ID in the error message because I am in SharePoint online and only way available is to send email to Microsoft with correlationid and wait for an answer. I was not ready to to that so I decided to try different option and finally found what worked like a charm. To send email to Group or multiple user instead of using "Email Address;Semicolon delimited" use "Login Ids; Semicolon Delimited" When I used as shown in figure the workflow sent out email fine both for Groups and individual users.


The example i have here is with users but the same works for Groups and i checked. I will update the images later.


Note: This approach is not going to help to send personalized email by adding user name for which we have to use other approach like using web services to get current user.

Hope this helps someone. Leave your thoughts in comments.


Tuesday, October 15, 2013

Windows Phone App ; Chennai Auto Fares

Traveling in Auto is a nightmare in chennai with no standard fare structure and no driver is ready to even use meter and even if used will be maligned meter which shows widely unexpected price for a short distance. Those days are not gone and The Govt of Tamil Nadu with the Hon Supreme Court of India's direction released a standard fare structure and made it mandatory for all auto to have electronic meter calibrated with new fare structure. No Auto in the City of Chennai can ply on the city roads without properly functioning meter and each auto is mandated have fare card in the Auto. Auto's will not be issued permit by the RTO if they do not meet the criteria.

This is welcome move by the Govt of Tamil Nadu and thanks to the Hon Chief Minister. Now it is our turn to adhere to this rule and demand Auto Drivers to show fare card. Lot of us travel in hurry and sometime we feel it would be good to have the fare information handy even before getting an Auto. Thanks again to the Govt of TN which released the information publicly.

Smartphone are most prevalent in these days and with most of Indians fascinated with Nokia phones it wouldn't be much better to have an APP that provides the fare structure right in your hand at the time you want. That is the reason for this app in windows phone store.Travelers don't have to complain about Auto travel in chennai. The app is an attempt to improve chennai's diginity and score relatively high on travelers mind especially foreigners.

You can download this app from windows phone store or following the Link.

APP Screen Shots


Tuesday, July 23, 2013

SharePoint 2013- Installation Part 6


Part 6: SQL Server Install.


In the Part 1 of this series we saw how to create a VM with Windows Server 2012. In part 2 we continued with server 2012 install and renaming the our VM. In Part 3 we enables Active Directory Domain Services in the server and in Part 4 we looked at configuring DNS in the server. The first 4 parts completes the system preparation for installing SharePoint. At this time before we start out SharePoint installation process please run windows update and check for new updates so that we have latest updates for all the roles that was enabled. In Part 5 of this series we saw what user accounts for service application and SQL server accounts are needed and their permissions.


Once we are through with all our updates we are ready to get going. In part 6 we'll be seeing how to get SQL server installed. Since the VM we are building is a development machine we will be installing SQL server in the same machine.


SharePoint 2013 can be installed on SQL Server 2008 R2 (64-bit) but in our series we are using 2012 products and in the same line we will use SQL Server 2012. SharePoint 2013 runs on 64 bit architecture and hence everything goes without saying as 64-bit.


Download SQL server 2012 from Microsoft or if you have msdn you can download it from there too. We will use enterprise edition in our tutorial. If you have SQL product key use that key or you can buy a new key. If you just going to create a VM for practising you can use trial version too.


Start the SQL Server setup. you will be asked to enter License Key. Enter your license key if you have one or use evaluation version and click Next


Accept License terms and click next


Check the checkbox to include SQl Server updates and click next


Click install and wait for setup to complete


 Once the setup is completed you will now be able to set up roles and add features

 We can ignore warnings about Firewall and Computer being Domain controller. Since this being a simple install we can skip this but in production it is encouraged to have SQL server in a separate machine from Domain controller.


 Click Next and choose SQL server feature installation


Click Next and choose all the features that you want. I am just going to install Database Engine Services.Once done selecting  all the features that you want to be added click next


Setup will run a quick installation rules to make sure installation will go through fine. once done click next


Select default instance and click next


Setup will calculate disk space requirement and click next


Now in this step we will be prompted to enter service accounts. We will use the SQL service account to run SQL Server service


Accept default server configuration and add current user and SharePoint setup account user as administrator and click next


Keep clicking next until you hit ready to install step and click install in this step and let it run


it should take few minutes to complete the install and once completed everything should be installed and you can close the setup


Now we have SQL server 2012 installed and we are a step closer in achieving our target of SharePoint 2013.


Post your feedback in comments.


Friday, June 28, 2013

SharePoint 2013 Installation Part 5

Part 5 : SharePoint Service Accounts

Part 1: Preparing the environment
Part 2: Installing Windows Server 2012
Part 3: Adding Active Directory Domain Services
Part 4 : Configure DNS 


In the Part 1 of this series we saw how to create a VM with Windows Server 2012. In part 2 we continued with server 2012 install and renaming the our VM. In Part 3 we enables Active Directory Domain Services in the server and Part 4 we saw how we can configure DNS in our server. That completes all necessary steps in preparing Windows Server environment to Host SharePoint. 

Starting in Part 5 we will see get deep into SharePoint prerequisites. SharePoint as you know since SP 2010 has embraced Service Application architecture. This is a clean and tidy process of separating different application and its resources. SharePoint 2013 continues on the same road and infact have leveled some of the bumbs that was present in SP 2010.

Though we are creating a development machine where we can run all services in single account but we should make it a habit of creating multiple accounts based similar to our production deployment so we adhere to best practices. I do this because this a practice for production and I also remember to create multiple accounts for service accounts

In this blog I will share some of the Service accounts that I always create even in development environment and their permissions.

I tend to base my service accounts requirements and permissions on these blogs because this explains much more lucidly than Microsoft technet. Todd KlindtVlad Catrinescu. and Eric Harlan has explained the need much more elaborately.  I took Todd Klindt table model as a example because it helps at a glance. Names can be anything and in development environment is at our discretion but in production please name in a way that anybody can understand. If there is any naming convention in the organization for production its better to stick to the convention.


Accounts for Base Install of SharePoint 2013


Account name
Role
Domain rights
Local SharePoint Server rights needed
SQL rights needed
sp_install
Used to install SharePoint binaries.
Domain User
Local administrator on all SharePoint boxes
public, dbcreator, and securityadmin SQL roles. Need to be SysAdmin on SQL when installing the Workflow Manager
sp_farm
Farm account. Used for Windows Timer Service, Central Admin and User Profile service
Domain User
Local Admin during UPS provisioning, log on locally right
public, dbcreator, and securityadmin SQL roles. Need to be SysAdmin on SQL when installing the Workflow Manager
sp_webapp
App pool id for content web apps
Domain User
None
None
sp_serviceapps
Service app pool id
Domain User
None
None
sp_content 
Default account used by Search Service Application to crawl content
Domain User
None
None
sp_userprofile
Account used by the User Profile services to access Active Directory
Must have Replicating Change permissions to AD. Must be given in BOTH ADUC and ADSIEDIT. If domain is Windows 2003 or early, must also be a member of the "Pre-Windows 2000" built-in group.
None
None
sp_superuser
Cache account
Domain User
Web application Policy Full Control
Web application super account setting
None
sp_superreader
Cache account
Domain User
Web application Policy Full read
Web application super reader account setting
None


Accounts Required for SQL Server


Name
Role
Domain rights
Local SharePoint Server rights needed
SQL rights needed
SQL_Admin
SQL Admin on the SQL Server. Used to Install the SQL Server.
Domain User
None
Local Administrator on the SQL Server
SQL_Services
It is the service account for the following SQL Server services: MSSQLSERVER SQLSERVERAGENT.
Domain User
None
Will be given necessary permissions when SQL Server is installed by a local administrator on the SQL box


I usually use one account for SQL but Vlad Catrinescu. has explained the security and even has more advanced scenarios.

Accounts Required for Search

Name
Role
Domain rights
Local SharePoint Server rights needed
SQL rights needed
SP_Crawl
The Default Content Access Account for the Search Service Application
Domain User
None
None
SP_Search
Service Account to run the SharePoint Search “Windows Service”
Domain User
None
None


Accounts Required for Optional Components

Account name
Role
Domain rights
Local SharePoint Server rights needed
SQL rights needed
sql_ssas
Account that we run the SQL Server Analysis Service services as
Domain User
None
db_datareader on databases
sp_excel
Excel services unattended account.
Domain User
None
None
sp_pps
PerformancePoint Unattended account
Domain User
None
None
sp_accsvc
Access Services. Used to create all Access databases in SQL and the service account running the service app pool for the Access Service Application
Domain User
None
db_owner, public, and securityadmin
sp_workflow
The RunAs account for the Workflow Manager service
Domain User
None
None


Its time to create all these accounts in our domain for our journey.

Let me know your thoughts in the form of comments.