Pages

Monday, November 10, 2014

Using SharePoint Chrome Control in APP model


I have been working on building an SharePoint Hosted app for some time now. App as we all know is running in a separate web called app web. The app web does not inherit from the host web for its Styling or user experience. often times we hear that user wants the same user experience as SharePoint. It is actually good for the developers if we could get the SharePoint user experience because it is one less thing that we have to worry about. Users are already familiar with SharePoint user experience and we do not have to train them to use our app.

Getting the Apps to inherit the SharePoint user experience is easier said than done. There is something called Chrome Control that Microsoft exposes in SharePoint. This is the top blue bar that we are now familiar with. The blue bar provides a simple but useful navigation back to the host site from the app site. How many time we have to create either custom navigation or JavaScript code to get this done.


In this pursuit I set out to create a reusable control that help me implement the chrome control that I can just include in my Apps and not worry about writing code.In the recent times I am more than in love with AngularJs. The reason being that Angular lets me write less code which is always better for the developer and the product. So in this blog let's see how we can create the angular based chrome control that we can use in our Apps. Without further ado lets see the code and how we construct it

I am using Office 365 Developer Site to do my development. The approach works and code works pretty much same for on-premise environment as well. The app I have here is SharePoint Hosted app. This works the same way for provider hosted app and auto hosted app as well.


Now create a DIV tag in the HTML file or the default aspx page

 <div data-ng-app="chromecontrol" data-ng-controller="chromecontrolController">
     <div id="chrome_ctrl_container"></div>
</div>


The highlighted div is the container for the chrome control and since I am using angularjs I am surrounding it with the data-ng-app and data-ng-controller attributes to bootstrap my chrome control

Next we will see how we wire the code up

Create a new JS file to define the angular app. I named the file as chromecontrolapp.js

var chromecontrol = angular.module('chromecontrol', []);

I am not passing any other argument to the app and I am just defining what my app will be called which I have specified in the HTML above with data-ng-app attribute.

Next we need to define our controller. For which add another file called

chromecontrolcontroller.js

Code in the controller block

var hostWebUrl, hostWebTitle, hostWebLogoUrl, options;

chromecontrol.controller('chromecontrolController', function ($scope) {

    // get the HostWeb URL, title & logo image
    hostWebUrl = decodeURIComponent($.getQueryStringValue("SPHostUrl"));
    hostWebTitle = decodeURIComponent($.getQueryStringValue("SPHostTitle"));
    hostWebLogoUrl = decodeURIComponent($.getQueryStringValue("SPHostLogoUrl"));

    // create chrome control settings
    options = {
        siteUrl: hostWebUrl,
        siteTitle: hostWebTitle,
        appIconUrl: hostWebLogoUrl,
        appTitle: "Stock Ticker",
        settingsLinks: [
          {
              linkUrl: "../Lists/Stock Symbol",
              displayName: "LIST: Stock Symbol"
          }         
        ]
    };

    // create the chrome control
    var nav = new SP.UI.Controls.Navigation("chrome_ctrl_container", options);

    // show chrome control
    nav.setVisible(true);

    // hide top app chrome (image & app name)
    nav.setBottomHeaderVisible(false);

});


 In the controller block I am defining a global variable  for hostwebURL, hostWebTitle, hostWebLogoUrl, options.

variable options is used to define the items that will be shown when the gear icon is clicked. 

 I do not want to show my site icon and app title hence I am setting the bottomheader to be invisible using the  command

nav.setBottomHeaderVisible(false); 
 One more thing to remember to set in the app is

SPHostTitle={HostTitle}

This needs to be set in the App Manifest so that we can get the Host web title. The standard token do not contain Host title and it only bring APP URL and Host Web URL

The entire source can be downloaded from the GITHub project. For further reference please refer to MSDN

Monday, May 19, 2014

Count Related Field

How many times we have cursed SharePoint for not able to get the item count natively without writing code or using workflow. There is an easier way which I stumbled up recently but may be some of you have already figured this out earlier. I wanted to document this so this can be useful for someone like me who is always interested in code.

Recently when I was working on a project where there is absolutely no server side code, pretty much everything was done at the client side. There was a need to get item count per category. This is simple on the list because we could just do a group by and we would know how many items in a particular category, but we wanted to use those number to draw chart. The group by numbers will not be useful and we cannot use char web part (yes I know chart part is gone in 2013 but this project is still in 2010).

How do we do this? We had a lists of categories in a list which is used as lookup for the categories column. We initially thought of writing a client side script that would count items and add it to a field. But this needs to be triggered every time a new item is added to the list. I was trying to create a new field and accidentally I chose lookup field and I noticed that there is a field called count related in the options when i chose the looked up list a source. When I created a field I could immediately see item count for all the items in the lookedup list. Form now on this becomes easy to use this chart part or anything you want even in code that would need to do count.

Figure shows how to create Count Related field

Create new List column Lookup


Item count corresponding to categories


Please leave your feedback in comments.

Wednesday, April 16, 2014

Get Site URL in Javascript

This post is more like a note of remembrance.I have been playing with Angular lately (I am not a expert just starting to explore). Thanks to my colleague Javed for his help. I was trying to create a web part to read information from the SharePoint site. I was faced with problem when trying to combine the CSOM with AngularJS. This could just be my poor Angular skills causing. But all i was trying to do was get the URL so I can do a GET using $http. I think the problem was in ExecuteQueryAsync.While trying to investigate I stumbled upon Nik Patel's article talking about getting site collection URL form.

Since we are using more and more javascript and client side development i think this would be a useful information to share.

_spPageContextInfo object is available by default in all SharePoint webpart pages and hence it becomes simple to get the URL as opposed to writing a lot of code to get a site collection URL. Though the returned URL is server relative we could easily form the full URL which can then be used in $http.get() in my case

here is how i used it

var url = window.location.protocol + "//" + window.location.host + _spPageContextInfo.siteServerRelativeUrl; 


// Form the full URL for $hhtp get
url = url + "_api/web/lists/GetByTitle('News')/items"


//Call Http Get
$http.get(url);

Sunday, March 30, 2014

Related Items Column SharePoint 2013

SharePoint 2013 is out for sometime and there are many new features including Client Side Object Model (CSOM) and new services like Translation Service and APP management etc. I am going to share an interesting thing that I stumbled upon today while setting up some POC using SharePoint for Project Management. This is interesting and useful because it becomes handy for setting up business processes in SharePoint.

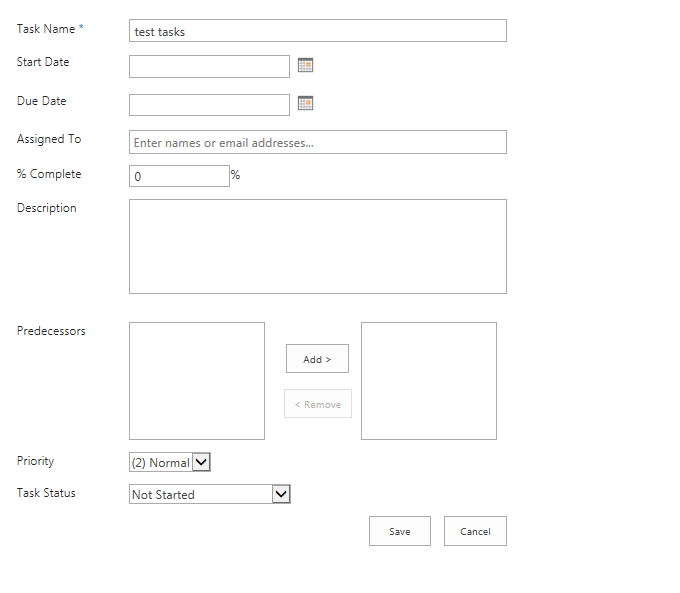
Today while setting up the site I happened to create a Task List and was going through all the fields. I noted a field type called "Related Items". We all would have seen "predecessor" field in SP2010 tasks list and "Related Issues" in SharePoint 2010 issues List. I now got curious to find out about this field because it looks new.


First, I clicked on the field in the List settings page to see information about the field. I did not field any information at all in the description. Next step is to check at the site columns. The field is not visible in site columns. This only means as we all know it is hidden. Now curiosity just shot up and really want to know why this field is hidden and what does this field has to offer and how is this field different from"Related Issues" or "Predecessor". One this is surely certain that this field is custom field type unlike other two fields which are lookup fields.


Now setting out to find out what this field has to offer what better way to find than by creating a task. So I created a new task but strangely enough I could not see the field in new form. This now becomes intriguing because if I am not seeing in New Form I am sure if I will see in Edit Form while editing the item or View Form. But I was in the mission of finding this out. So I decided to edit the item because as we all know we can have the property on the field "Show in New Form" to false but still show in edit form.


I was in the edit form and could not see the field. I was getting anxious because how I can fill the field if it not showing up in New and Edit Form.What is the use of the field that is hidden through out and what is SharePoint trying to achieve with this field? These were some of the question I had and decided to check the View Form.We all know that View form is readonly view of Edit Form, so I wasn't excepting anything but thought that it could be information only field that SharePoint auto populates.


With this thought I opened the View form and contrary to my impression i saw a link right across "related items" field. This is the first place I was able to see Related Items tied to an task item in the list. I went ahead and clicked the Link which brought up a Pop up which by default points to the site collection. Eureka. The "related Items" is allowing me to add items that are related to this tasks. I selected a document from document Library and clicked "OK" boom! the document is linked to the tasks. I was able to add multiple items at a time and even was able to upload a document to a library right there in the pop up. So if the document or the item is not available in SharePoint you will be able to add it and then link it all in one shot without having to close the pop up.This is huge.


 Now why do I think this field is useful?

The field is a big step forward where in enterprise when some one is assigned to work on a tasks the person creating the tasks can add all these related items as reference for the other person to work on. For example the project manager can add all reference to all project items corresponding to a tasks as related item.The reference items can be independently managed and updated. Example Project Plan, Resource Availability.We can add reference to any thing that is in SharePoint. It could be an Issue, list item etc.

This to me is better than having as attachment because the references are independent of the tasks item. This is makes a true relational setup and easy to maintain single version of truth that is referenced.

Right now we will only be able to add items in the present site collection but if  future if Microsoft allows us to add items stored externally or in different site collection which would makes this feature a jaw dropping feature in SharePoint until we unearth another hidden feature.

Hope you find this one useful and let me know your thoughts and suggestion in comments. I will be exploring SharePoint 2013 and until then happy SharePointing.

Friday, February 21, 2014

Working with SharePoint List Attachments

SharePoint Lists are a versatile artifact in SharePoint. It can be mend in any way possible to achieve the desired outcome. This is the reason to use List for all the help desk applications. Recently I had to build a helpdesk application but the client wanted to use plain vanilla SharePoint and wanted to avoid custom code and wanted to keep it to bare minimum. Building a simple helpdesk with List and no code is relatively straight forward but the catch here is they already had created a basic structure where they are using a list to collect the information from external users and the information is getting copied to a new list for internal users. This is done to implement separation of permission as mentioned earlier there is no code approach. This is in their POC environment.

Now they wanted to move to production.Implementation is done as follows

1. They are using attachments in the list to get relevant reference documents form external users.
2. Workflow is been used for copying item from one list to other.

The problem that they are facing is attachments are not getting copied. This is interesting because attachments in SharePoint lists are a linked item and is not part of the SharePoint fields. This is what is causing the workflow not to copy the attachment. Also there is no workflow activity that can copy attachment.

The way to solve this problem would be to

1. Create a custom Copy List Item activity with extended functionality to look for attachment and copy it.

2. Customize the List form with Infopath forms and make the attachment to be part of the list item (This I saw working but still could not comprehend why it works.)

3. Write a small event handler (Item Added and Updated(if you are allowing delayed submission) and copy the attachment.

We went with third option and reason for that being though we had to write code we could do it on a Sandboxed solution rather than a Farm solution which would be the case for option 1. Option 2 is ruled out because the client did not like infopath forms. Its good because we now know Infopath form is dead you can read this here)

There is another thing the remember with List Item  attachments. Since List Item Attachments are  stored as collection when you access them in code and these are collection of strings rather than a file. so we have to user getfile method to get the file and add it. Similarly adding an attachment do not need item update as it linked item.

Client is on SP 2010 and I had not  an opportunity to try this out in Client Side Object Model (CSOM or JSOM) which I am planning so that it becomes easy for SP2013 but will update this post after trying with SCOM/JSOM code.

Code :

foreach (string fileName in requestItem.Attachments)
{
  SPFile file =requests.ParentWeb.GetFile(requestItem.Attachments.UrlPrefix + fileName);
                                   properties.ListItem.Attachments.AddNow(file.Name, file.OpenBinary());

}


Monday, February 10, 2014

Set Field Created through UI to readonly

SharePoint fields are excellent form of reusable asset. There are different types of fields that can be created in the SharePoint environment. As a developer we tend to create some fields as readonly which we could achieve easily while creating the solution using FieldXML in the element.xml file. But there are time when we had to create fields from the SharePoint UI which do not provide the flexibility of setting the field readonly. We would come across these scenarios when we want to have a field that will be used in Workflow or even some times we do not what to show the fields in Edit and Newform of the list or library. It would be an overkill if we create a solution for deploying a readonly field.

There is always poweshell who is our best friend who will never let us down in need. A small script would help achieve this. Below is the script that I wrote to set a list field to readonly.


Add-PSSnapin Microsoft.SharePoint.PowerShell -ErrorAction SilentlyContinue
#Get the Web
$web = Get-SPWeb "http://sp2010"
#Get the List
$List = $Web.Lists["Daily Email"]
#Get the Field
$Field = $List.Fields["Email User"]
#Set the field to Read only
$Field.ReadOnlyField = $true
$Field.Update()

Note that I am using Display name of the field instead of internal name. Please feel free to extend this  script if you like. Also make sure you are running this script as Admin user.

I will share the next thing I experiment and until then Happy SharePointing.As always if you have any suggestion or question feel free to ask in the comment section so we all can learn together.

Monday, February 3, 2014

Death of Infopath Forms

Infopath forms has been both blessing and pain at the same time since SharePoint 2007. With the growth of new web technologies, we always wonder is there a place for infopath forms in SharePoint universe. The inherent limitations and clumsiness of infopath forms has finally come to an end. Yesterday the office team has clearly elaborated on the course of infopath form going forward.

InfoPath, though a useful tool for customization on SharePoint it always lacked functionality which prevented it becoming mainstream. So the verdict is finally out and it is death of infopath forms and there will not be any future releases of infopath forms beyond 2013.

Let us hope that Microsoft comes up with really cool forms interface and development environment soon.

Happy coding and RIP Infopath we will definitely miss you if not a lot may be little.

PS. is there any acquisition by Microsoft (K2 or Nintex).

Monday, January 27, 2014

Get SharePoint WSP from Central Admin

SharePoint solution are most common way of deploying farm solutions in enterprise. There are times when we need to download the solution from central admin for variety of reason. Recently one of the client had a issue where they had multiple version of a DLL and they wanted to know which version of DLL is deployed with the SharePoint Solution. If you do not have a document or Change control process it is difficult to track back. What is a option now because we do not have any documentation on which version was deployed?

Only way out is to get eh WSP that was deployed and extract the WSP to get the DLL and reflect the DLL to find the solution.So far so good but how to get the WSP that was deployed to SharePoint. We cannot download the WSP from central admin through UI. How else we could do this? This is where the powershell panacea of all things SharePoint comes into play.

Powershell command exists to achieve this and we can use this to download the solution from Central Admin. 


$farm = Get-SPFarm  // Get Farm
$file = $farm.Solutions.Item("test.wsp").SolutionFile  // Get SOlution File
$file.SaveAs("c:\test\test.wsp") //Save solution file to Local directory
 
This is how easy to achieve the result using powershell. Make sure you are running this
command with admin privileges. 
 
There is no STSADM equivalent for this solution and I should thank my colleague for
introducing me to this powershell command.